
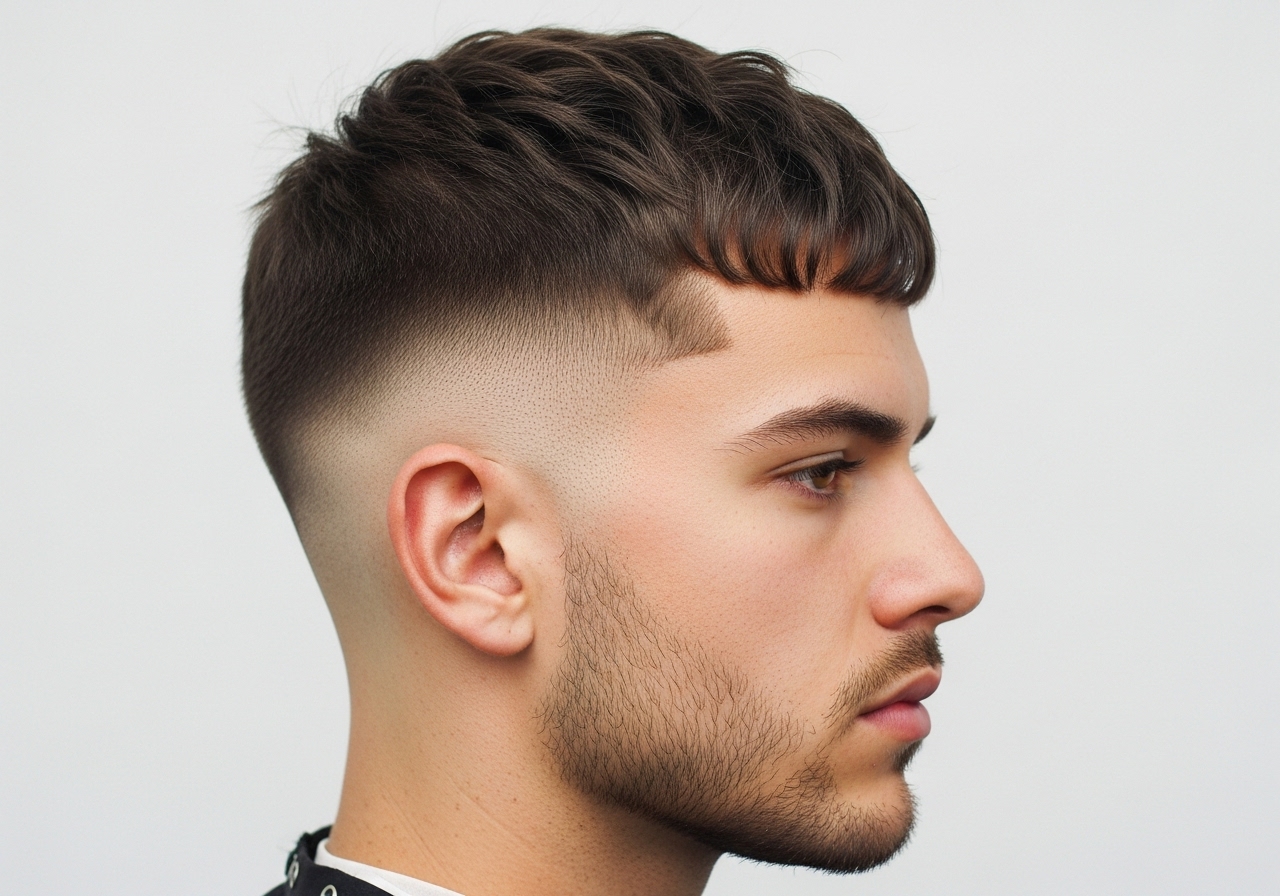
A low taper textured fringe is one of the easiest modern hairstyles to style at home because it naturally looks soft, messy, and relaxed. You don’t need strong gel or heavy products to make it look good. Instead, this haircut uses simple texture, natural movement, and a clean taper on the sides. With the right steps, you can style this haircut in just a few minutes every morning. The low taper keeps the sides neat near the ears and neck, while the textured fringe gives the top a messy, stylish look that works for straight, wavy, curly, and coily hair. This guide will teach you exactly how to style it at home, what products work best, what tools you need, and how to make your fringe fall naturally in place without looking too greasy or too flat.
Styling this haircut doesn’t require barber skills. You only need to learn how to handle your hair type, how to create texture, how to control the fringe, and how to keep the taper looking clean. Many people think textured hairstyles are difficult, but in reality, the haircut itself does most of the work. Your job is to shape it a little each day so it stays neat and stylish. By the end of this article, you’ll know the full routine for making your low taper textured fringe look clean and natural every single day.
What You Need Before You Start Styling
You don’t need expensive tools to style this haircut. Simple items you already have at home are enough.
Basic Styling Tools
- Comb or brush
- Hair dryer (optional)
- Small scissors (for small fringe adjustments)
- Spray bottle (to wet hair slightly)
- Hand mirror (to check the taper)
Hair Products
Choose based on your hair type:
- Hair cream (light, natural hold)
- Matte clay (texture + volume)
- Curl cream (for curls and waves)
- Sea salt spray (messy look)
- Leave-in conditioner (softens hair)
Start small. You can always add more product later.
How to Prepare Your Hair for Styling
No matter your hair type, styling always begins the same way.
Step 1: Make your hair slightly damp
- Not fully wet
- Not fully dry
- Towel-dry gently
Step 2: Comb your hair into place
This helps you see your natural fall.
Step 3: Choose the direction of your fringe
You can push it:
- Forward
- Slightly to one side
- Slightly downward
- Curved across your forehead
Once your hair is prepared, styling becomes easy.
How to Style the Textured Fringe
The fringe is the star of this haircut.
Here’s how to make it look soft and natural.
Step 1: Apply a small amount of product
Use:
- Hair cream for a natural look
- Matte clay for a sharper texture
- Curl cream for curly or wavy hair
Rub the product into your palms, then apply gently to the front of your hair.
Step 2: Create texture with your fingers
This is the most important step.
- Pull small pieces forward
- Twist the ends slightly
- Separate sections for movement
- Don’t shape it too perfectly
A textured fringe should look messy but controlled.
Step 3: Use a blow-dryer (optional)
Blow forward for more fringe volume.
Blow slightly downward for a soft look.
Use low heat to avoid frizz.
Step 4: Finish with tiny adjustments
- Pinch small pieces
- Lightly ruffle the fringe
- Avoid making it too sharp
The fringe should look natural, not stiff.
How to Style the Top With the Fringe
The top connects the fringe and the taper.
Each hair type needs a slightly different approach.
Straight Hair
- Use matte clay
- Push forward or upward
- Add finger texture
- Blow-dry for height
Wavy Hair
- Use curl cream
- Scrunch hair upward
- Let waves fall naturally
- Avoid combing when dry
Curly Hair
- Use curl cream + leave-in conditioner
- Scrunch curls
- Diffuse with low heat
- Let fringe fall naturally
Coily Hair
- Use moisturizers
- Twist small curl sections
- Use sponge brush gently
- Avoid heavy product buildup
The top should always blend smoothly into the fringe.
How to Keep the Taper Looking Fresh
The taper is what makes this haircut clean.
If the taper grows out too much, the hairstyle looks messy even with a good fringe.
You only need to maintain three small areas:
- Sideburn area
- Neckline
- Around the ears
How to keep it clean
- Use a trimmer once a week
- Clean fuzzy hair near ears
- Shape neckline lightly
- Blend lightly with guard 1 or 0.5
Do NOT
- Cut too high
- Try to fade like a barber
- Push the taper upward
- Shave too deeply around the ears
Small clean-ups = fresh look.
How to Style for School, Work, or Daily Life
This haircut works for every situation.
School Look
- Light product
- Push the fringe forward
- Natural messy top
Work Look
- Hair cream or light pomade
- Fringe slightly controlled
- Soft shape with minimal texture
Casual Daily Look
- More texture
- Sea salt spray
- Slightly messy fringe
Special Events
- Matte clay for a stronger texture
- Define the fringe in pieces
- Clean edges around the taper
This haircut can shift from soft to sharp easily.
How to Style With a Blow-Dryer
Blow-drying helps shape the fringe and top.
For more volume
Blow upward.
For a softer look
Blow downward.
For wavy and curly hair
Use a diffuser to avoid frizz.
For a messy texture
Blow in different directions for natural movement.
A 2-minute blow-dry can transform your look.
Common Styling Mistakes to Avoid
Many people make simple mistakes that ruin the style.
❌ Using too much product
Makes fringe heavy and oily.
❌ Brushing the fringe too much
Destroys natural texture.
❌ Applying product to soaking wet hair
Weakens the hold.
❌ Not drying the fringe at all
Makes it flat and lifeless.
❌ Using strong gel
Removes softness and movement.
❌ Ignoring the taper
A clean taper completes the haircut.
Avoid these mistakes to keep the style sharp.
How to Style Based on Hair Length
Short Top
- Use matte clay
- Minimal fringe movement
- Easy to style daily
Medium Top (most popular)
- Best for texture
- Gives natural, messy look
- Fringe falls neatly
Long Top
- More movement
- Requires curl cream or sea salt spray
- Needs layers to stay neat
Ask your barber to layer the top if your hair feels heavy.
How to Refresh the Style Throughout the Day
Sometimes hair falls flat or gets messy.
Quick fixes:
- Wet your hands and run them through your hair
- Add a drop of product
- Scrunch the fringe
- Push the sides down
- Smooth edges if needed
You don’t need a full restyle.
Why This Haircut Works Well With Texture
Texture makes hair look full and stylish. A flat fringe looks boring, but a textured fringe adds personality.
Texture gives:
- Volume
- Movement
- Shape
- Natural look
- A soft finish
Even people with straight hair can get texture with the right product.

How to Maintain the Haircut Over Time
If you want your hairstyle to stay perfect, follow this simple schedule.
Daily
- Light product
- Moisturizer (for curls)
- Set fringe into place
Weekly
- Trim taper edges
- Refresh fringe shape
Every 3–4 Weeks
- Visit a barber for a full trim
- Re-texture top
- Refresh taper
This routine keeps the haircut sharp and stylish.
Conclusion
Styling a low taper textured fringe at home is easy once you understand how your hair moves and what products work best for you. With a simple routine, a little moisture, the right product, and a clean taper, you can make this haircut look fresh every day. The key is keeping the fringe soft and textured, shaping the top properly, and lightly maintaining the taper to keep the sides clean. Whether you like a natural style, a messy look, a fuller fringe, or a sharper shape, this haircut gives you endless options. And if you want to compare this style with others like the Low Fade Haircut, feel free to explore more ideas on our site for fresh new looks and grooming inspiration.
Disclaimer
This article gives general hair styling tips. Everyone’s hair is different, so results may not be the same for all people. Always be careful when using scissors, trimmers, or heat tools. If you are unsure, ask a professional barber for help.